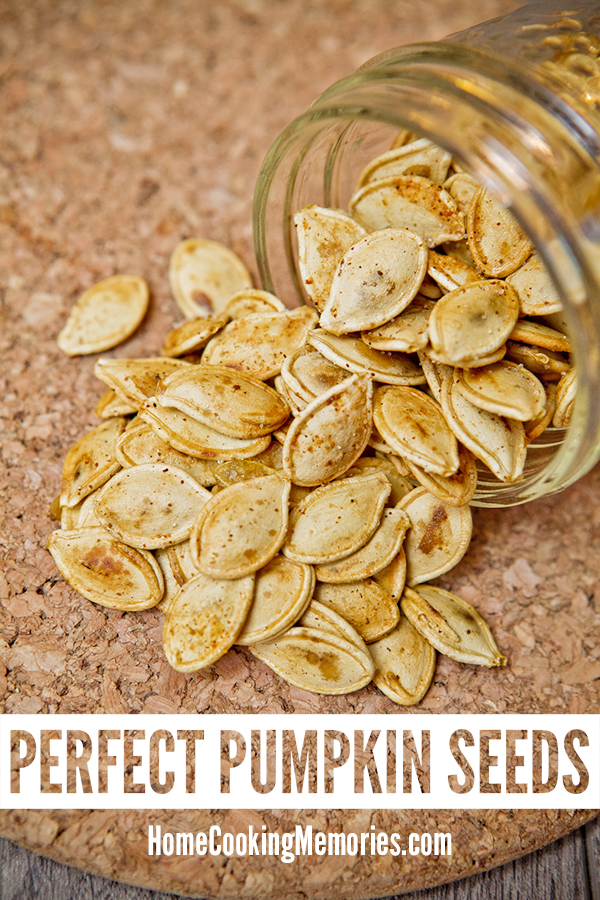
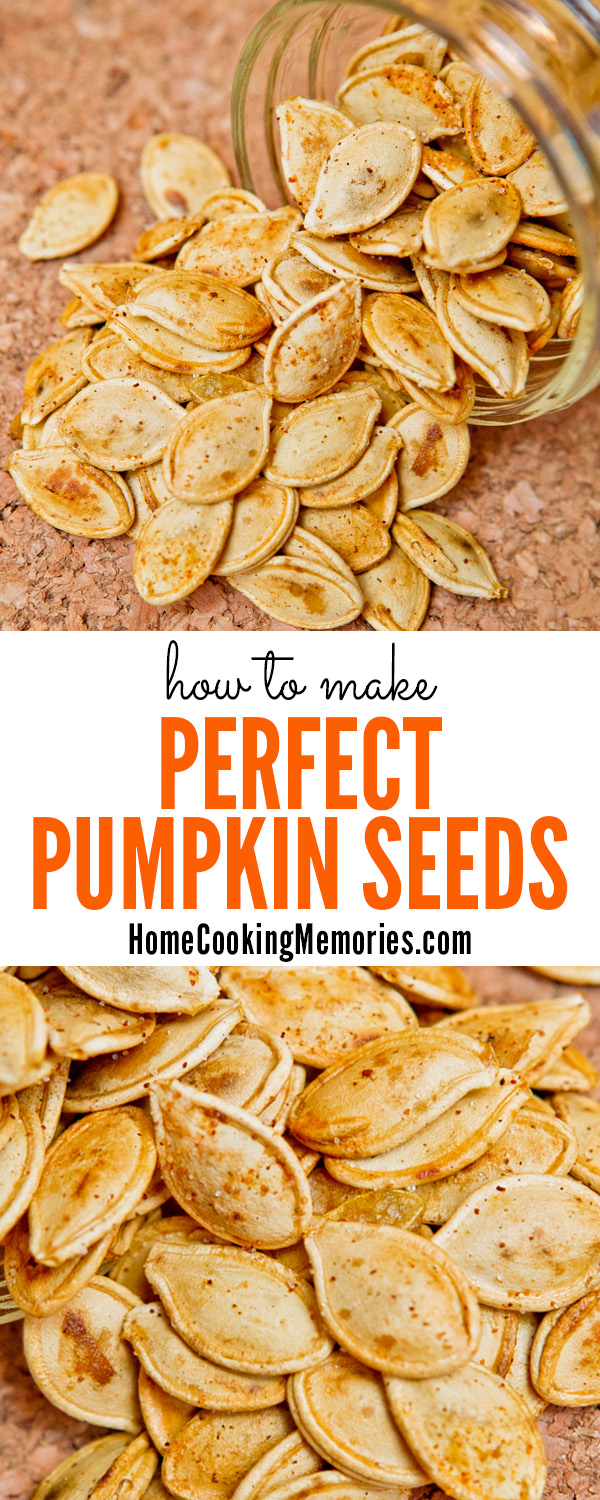
After you’ve carved your jack-o-lantern for Halloween, it’s time to roast perfect pumpkin seeds! Use this pumpkin seed recipe to make this salty and crunchy snack, that’s healthy too!
This post contains some affiliate links for your convenience. Click here to read our full disclosure policy.
One of our Halloween traditions has always been to roast the pumpkin seeds that come out of the pumpkins that we carve. For as long as I can remember, we always did this as kids and then I started and continued the tradition with my own kids. In our house, there is no way you carve a pumpkin without also roasting the pumpkin seeds afterward.

How To Clean Your Pumpkin
The first step to getting perfect pumpkin seeds is cleaning your pumpkin!
- Set up a work area: We usually lay down newspaper or an old plastic tablecloth to keep our area clean.
- Cut off a lid to your pumpkin: Cut a 2-3″ circle radius around the stem to do this.
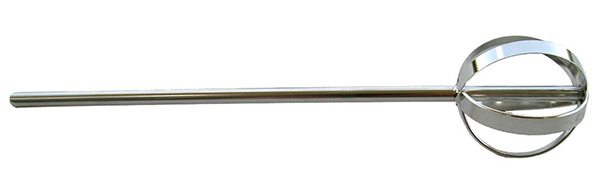
- Clean out the inside of your pumpkin: This is where you get all the seeds from. You can use a metal spoon or an ice cream scooper to scrape and scoop the insides, but we think a pumpkin scoop works better. Want the very best option? If you have a drill, then the “Pumpkin Gutter” attachment is awesome — makes the job super easy and less messy.
Best Tips for Perfect Pumpkin Seeds
Making your own roasted pumpkin seeds is really easy, but there are three steps that are most important:
#1. Clean your pumpkin seeds well: You really want to wash them well and discard of any and all pumpkin fibers. Over the years, I’ve had a time or two when I didn’t clean the seeds well enough and they really don’t turn out as well. So, grab your colander and clean them…and then clean them again.
#2. Boil pumpkin seeds before roasting: If you are short on time, you could skip this step, but we highly recommend that you boil your pumpkin seeds before roasting them. We have more details below about why.
#3. Keep a watch on them when they are baking: I’m really bad at getting sidetracked, so I set my kitchen timer for 10 minutes. This way, it will alert me and I can go in and move the pumpkin seeds around on the baking sheet. I repeat this every 10 minutes until they are done. I’m very serious about using the timer — there have been times when I didn’t do it and sure enough, I let them burn.
Why Boil Pumpkin Seeds Before Roasting?
There are a couple reasons why we recommend that you boil pumpkin seeds before roasting. Boiling before roasting pumpkin seeds helps to cook the insides of your pumpkin seeds so when you do roast them, you will get perfect crunchy pumpkins seeds. Boiling will ensure that the insides are cooked.
Also, roasted pumpkin seeds are full of nutrients, but they also contain phytic acid, which is naturally found in nuts, whole grains, and seeds. Phytic acid can prevent the absorption of some nutrients, like iron, magnesium, and calcium. By boiling the seeds before roasting, this them removes most of the phytic acid that they contain helping you to get even more nutrition out of them!
How To Eat Pumpkin Seeds
If you are new to roasting pumpkin seeds, you might be wondering just how to eat them. If they are nicely roasted, I like to eat them whole, as does most of my family. If you wish, you can also eat them how you would eat a sunflower seed, by cracking the outer shell open slightly with your teeth, eating the seed on the inside, and discarding the outer shell.
How to Make Perfect Pumpkin Seeds
Here is the full recipe and instructions for roasting perfect pumpkin seeds – ready for you to print!
Like this recipe? We’d love for you to share on Facebook with your family and friends or for you to pin it on Pinterest!
Perfect Pumpkin Seeds
- Total Time: 85 minutes
Description
After you’ve carved your jack-o-lantern for Halloween, it’s time to roast perfect pumpkin seeds! Here’s the recipe for how you can make this salty and crunchy snack.
Ingredients
- Seeds from 2 large pumpkins
- ½ teaspoon Lawry’s Seasoned Salt
- ½ tablespoon olive oil
- Dash of salt
Instructions
- Preheat oven to 350 degrees F.
- Scrape out and remove seeds from your two pumpkins. Wash and clean your seeds from your pumpkin, making sure you remove any unwanted pumpkin rinds or deformed seeds. Wash in a colander and once again remove any unwanted items.
- Soak the clean seeds in a bowl full of water for 1/2 hour on the kitchen counter or overnight in the refrigerator. Drain the seeds, discarding the water.
- Fill a pot with water and a dash of salt (enough water so that it will cover the seeds). Bring the water to a boil. Place seeds into the boiling water and boil gently for about 10 minutes.
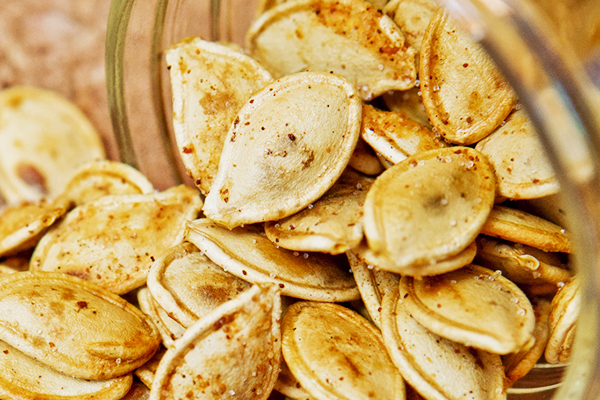
- Turn off the heat and drain the seeds and place back into your empty bowl. Toss seeds with olive oil. Lay out seeds in a thin layer onto a cookie sheet. Sprinkle with Lawry’s Seasoned Salt. Place in oven and move and turn the seeds over about every 10 minutes, making sure they are not burning. Seeds are done after about 40 minutes or when they become firmer and are no longer soft. You do not want dark spots on your seeds, you want them to be a darker yellow.
- Season with additional salt if desired. Remove from oven and allow to cool. Place into a clean mason jar or another food-safe storage container. Enjoy!
- Prep Time: 45
- Cook Time: 40 minutes
- Category: Snack
- Method: Roasting
- Cuisine: American
Thank you to our contributor, Leah Wood, for this recipe & photos!
Check out these other Halloween recipes!
Spiderweb Sandwich Cookies with Marshmallow Buttercream Filling

Halloween Eyeball Pinwheels Appetizer

Cristianna says
I’ve been making roasted pumpkin seeds with my mom since I was little. We had never boiled them before, but I gave it a try. I drained the seeds after boiling, then immediately tossed them in olive oil and seasoned them before roasting.They turned out perfectly crunchy and delicious! I was surprised they didn’t need to dry at all before roasting.
Pam says
I’ve been making pumpkin seeds for 60 plus years and I saw this on Pinterest and decided to try them. They are the best I’ve ever done! Thank you!
Mark Marinchek says
Do you leave the oven on 350 degrees for the full 40 minutes.
Deb says
Been making for about 3 years. They come out wonderful. It’s a lot better than just roasting them.
Jordan says
Definitely should be mentioned in your recipe that you need to dry seeds after boiling before putting them in the oven so they don’t turn out chewy. I made the mistake of going by the recipe word for word and they didn’t turn out crispy. Other than that it was is good!
Dina says
I’ve made this twice now. They are crunchy and last for quite a while. It is very easy to overcook. I think I had them cooked perfectly (but I wasn’t sure, hind site) butt I put them back in for 5 min. They are now almost burned. Once it’s almost done it changes quick.
Doug says
The key is to really watch them. You want to take them out of the oven immediately upon crisping. Very important to be a single layer. I boil mine in a salty brine so that the salt is absorbed into the seed. And I do like to dry them a little after boiling.
Pamela Wilson says
These are very good
Jeff says
Simplicity at its best! I have about 8 pumpkins sitting on my front porch and I’m only thinking of the roasted pumpkin seeds.
Allan Gaudette says
First you talk about boiling than soaking, what,s up?
Sharon Vido says
I made this recipe for the first time…FABULOUS…The boiling is what was missing. I will keep this one. Needed to bake longer.
Alice Massoglia says
We like ours just salted, so I just boiled them in salty water and roasted them plain until they were dry, then hit them with a little cooking spray. They are perfect: a little salty, very crunchy and the perfect snack for me and my grandson. Knowing that I can do this with seeds from winter squash, too, will put them on my menu more often throughout the year.
Allan Gaudette says
Why would you roast and then oil them?
Jon Jackob says
I am assuming to make sure they were very dry first. It’s a difficult to dry them after they’ve been washed. I laid them out on the baking sheet and let them sit for about an hour then tossed them in a little EVOO. They were not completely dry but they were better than completely soaked. I also used salty water and then sprinkled them with a little more salt as I like them very salty.
Carrie Jaske says
No wonder my pumpkin seeds didn’t ever come out right. I never knew to boil them first. Wow I’m very impressed using this recipe.
Cath V says
Perfectly crunchy. No need to throw away the shells. I took your advice with the time. I swished the seeds around every 10 minutes and took them out of the oven at 37 minutes. Yum!
Kaila says
I followed basically everything to a T, except I didn’t refrigerate the seeds overnight. Only because I forgot to put them in there.
While the seeds were roasting, after maybe 15-20 minutes, they started popping! Do you know why that would happen?
I tried one of them and it definitely wasn’t cooked. I reduced the temp to 300 and am trying that now!
Really curious!
KR says
This is the first time I’ve boiled pumpkin seeds before bakng. It made a difference and roasted up much better. Great taste too! Thanks.
Debbie says
Yep… definitely a keeper! I did sprinkle a bit more seasoned salt the first 2 times I stirred the seeds while they were still a bit wet. Love how they turned out nice and crisp!!
Tiff says
I made this recipe and needed to bake it quite a bit longer but they turned out fantastic! Love the taste!
Thank you!
KRISTA SOWLES says
I have been making pumpkin seeds, since I was a little girl, and that was 50 years ago. Although I have made them similarly to this,and this is the better of the recipes as far as cooking the integrity. I use garlic salt and cayenne pepper for flavor though, we like it hot!! all-in-all, a great recipe thank you!
Lisle says
I like to use about 1 cup of salt when I boil the seeds, making them similar to the salted pumpkin seeds we used to buy when I was a kid. Just checking recipes to remind me of the baking temp and time. Thanks!
Angela says
I love this recipe! I have used spaghetti squash too and they taste delicious!!!
Rita says
Great way to save pumpkin seeds. What a good idea to save !
Amber Ferguson says
I love pumpkin seeds! I am featuring you today at TFT. Thanks for sharing!
Michele Morin says
YES! The best part of the pumpkin!
Life Diet Health says
There’s such a thing as a pumpkin gutter drill attachment? Oh my – that would make it so much easier! 😛 I never even thought about boiling my seeds – intrigued now as to how the taste would change! Thanks for sharing over at Fiesta Friday!
Holly Campbell says
Just attach your basic hand mixer attachment to a drill and you are set! So fast and easy!!
Catherine Baez Sholl says
These look so delicious, perfect snack! Definitely pinned for later. Found it at the Fall into Fall party.
Helen at the Lazy Gastronome says
I love pumpkin seeds – Thanks for sharing at the What’s for Dinner party – can’t wait to see what you’ll bring next week. Have a fabulous week ahead.
Lisa // Cucicucicoo: Eco Sewing & Crafting says
Mmmm! I love pumpkin seeds so much! These look wonderful! 🙂 Lisa
Amy says
I’ve thought many times that I would bake pumpkin seeds but I have never actually done it. Thank you for sharing this recipe on Snickerdoodle Create Bake Make. Pinned.
David says
Thank you for sharing! I planned on baking pumpkin seeds next week and was searching for a little while for one that looked easy!
Vivian says
I found your recipe and plan to use it soon. Walmart marked their pumpkins down to a dollar apiece after Halloween so I bought some for the seeds. The pumpkins will go out for the deer and other animals. Your recipe sounds great, I’m looking forward to trying it.
Skyler says
I LOVE this recipe! My favorite after fall pumpkin carving 🙂
MaryJo says
We carved pumpkins yesterday, and I made the seeds today. I painstakingly followed these instructions, and thought to myself, I’m not sure if I’ll do all this next time. Seems like a lot of work. WRONG. These are the most amazing pumpkin seeds I have ever had in my life. Just the other week I bought a bag from the store, and I never want store bought ones again. Worth every single step. Except next time, I want to do more seeds! They’ll be gone before I know it!
Lisa says
I totally disagree with the cleaning part. I take away the larger pieces, but the sticky film on the seeds from the pulp helps the seasonings stick (you can try all kinds of mixes) WITHOUT having to use any oil, and adds to the taste.
Kim says
My husband LOVES this recipe. Thanks!!!
Varv says
Followed prep and cooking instructions. Changed seasoning to chipotle, garlic salt and coriander. Best roasted pumpkin seeds I ever had. I never heard of boiling them first but it made them perfect. Thank you so much
Eric says
Boiling them is absolutely not necessary—the insides cook plenty during the long roasting process.
Helen at the Lazy Gastronome says
My dad made THE best pumpkin seeds. I don’t know how he did it – I’ve never been able to reproduce them. These look pretty darned close! Thanks for sharing at the What’s for Dinner party! Hope you were able to check out some of the other awesome recipes there too!
Alisa says
I bet Amoura would love them. I will have to try it with her this year.
Julia says
I tried making these today, and after 10 minutes in the oven there were dark spots all over the seeds. What did I do wrong? I’ve checked the temperature on the oven and it seems to be right.
Dawn says
This is my first time trying this recipe tonight, so I hope they turn out good ???? I only have canola oil would that be okay if I didn’t use olive oil ??
brandie says
I haven’t tried it with canola oil, but I think it would work fine. 🙂
Kathy says
What temperature do you bake them at
Molly says
Do you have the ratio to use cinnamon/sugar instead of Lawrys?
Jennifer Bly says
We love pumpkin seeds! I just roasted a whole bunch last week!
Thanks for sharing (and for linking up to the #SHINEbloghop).
Wishing you a lovely week.
xoxo
Helen at the Lazy Gastronome says
Thanks for sharing on the What’s for Dinner link up!!
Christine says
Great snack recipe! Stopping by from Share the Wealth.
Katie says
Thanks for the recipe!! I share your link in my latest blog post, 50 Things to do this Fall – Thank you 🙂
Vickie @Vickie's Kitchen and Garden says
I need to try this…great snack for dieting. thanks for sharing at the #HomeMattersParty
Karren Haller says
My son would love these
Thanks for sharing on the #OMHGFF hope to see you next week!
Pinned to share!!
Hope you have a great week!
Kristine Hart says
I haven’t had pumpkin seeds in so long. Thanks for the refresher on how to cook them! Your’s look delish!
Kristine 🙂
Sonja @ SustainMyCraftHabit says
Your pics are amazing! They’re making me want to roast some seeds tonight!
Kathleen | Hapa Nom Nom says
One of my best memories of fall is carving the pumpkin with my mom and then roasting pumpkin seeds with my dad. I could snack on these all day! In fact, these days I buy pumpkins for the seeds alone 😉
creativejewishmom/sara says
Thanks so much for sharing on craft schooling Sunday, looks great!
Tesla says
I love roasted pumpkin seeds but I have never made them on my own before. I tried this tonight after I carved my pumpkin. I was so excited. I followed all the directions to the T, so I think my oven may cook hotter than the temp it’s set on because when my second 10 minute timer went off and I went to stir them around a bit they were burnt. I will definitely try this method again though and check them around the 12-15 minute mark.
Karen says
Have you ever had the seeds pop like popcorn in the oven? I was only 15 minutes into baking them and had to turn the oven off because they were popping all over the place! What did I do wrong?
brandie says
Hi Karen,
I bet you did do anything wrong. The seeds may pop a bit, and that’s totally normal, but I’ve never had trouble with them popping off the pan. It could be a couple different things — your oven might cook a bit hotter than it’s actually saying (an oven temperature gauge is helpful for determining if this might be the case). Or it could just be the seeds themselves, as I hear that large seeds can pop more. In either case, if you give them another try in the future, I would recommend turning down your heat a bit if you start to hear them popping too much. Hope that helps.
christine says
I had the same problem and i believe i will next time let them dry out first. there is absolutely no way my oven is hotter than it says. Others have suggested the fact they are not completely dried out overnight before cooking is the issue…
Michael says
Made these today and LOVE them. We’ve never boiled ours first and this was the missing step we didn’t know we were missing. The only thing I’ll change next time is to add the seasoning to the seeds while still in the bowl instead of waiting until they are on the pan. Thanks!
brandie says
Great, Michael! Glad you liked it and thank you for the tip with the seasoning. I will have to try that method next time.
Carrie Groneman says
Hey Brandie, Just last night my nephew who lives near LV texted for a recipe for roasting pumpkin seeds and I told him to google it. I’m giving him your recipe asap – and me too! Thank you for linking up at Wonderful Wed. Blog Hop and hope you can bring another great idea next week. Carrie, A Mother’s Shadow
brandie says
Great, Carrie! Thanks for sharing it and for the hosting Wonderful Wednesday blog hop.
Danielle Smith says
What temp do you set the oven to? This always seems to be a problem for me when I try roasting pumpkin seeds.
brandie says
Hi Danielle,
The oven temp on these is 350 degrees F.
Rachelle says
I want to try out your recipe. I wasn’t aware that they can also be eaten whole.